![[iOS] カスタムUIButton の drawRect を呼んで角丸ボタンを作ってみた](http://syake-labo.com/blog/wp-content/uploads/2011/07/ios-custombutton-thumbnail-160x160.jpg "[iOS] カスタムUIButton の drawRect を呼んで角丸ボタンを作ってみた")
iOS で画像を使わずに角丸ボタンを作ってみました。
UIButton でボタンを描画する方法
UIButton でボタンを描画する場合は drawRectメソッドを利用します。
- (void)drawRect:(CGRect)rect {
    // ここに記述
    [super drawRect:rect];
}
グラデーションカラーの角丸ボタンを作成
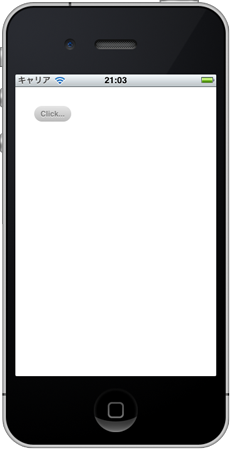
こんな感じのを作ってみたいと思います。

CustomButton.m を作成
とりあえず、CustomButton.m を作成して、drawRect の中身にグラデーションカラーの角丸ボタンの記述を追加してみました。
CustomButton.m
@interface CustomButton : UIButton
@end

@implementation CustomButton
-(id)initWithFrame:(CGRect)frame {
    if ([super initWithFrame:frame]) {
        self.titleLabel.font = [UIFont boldSystemFontOfSize:12];
        self.titleLabel.shadowOffset = CGSizeMake(0.0, 1.0);
        [self setTitleColor:[UIColor grayColor] forState:UIControlStateNormal];
        [self setTitleShadowColor:[UIColor whiteColor] forState:UIControlStateNormal];
        [self setTitleColor:[UIColor grayColor] forState:UIControlStateHighlighted];
        [self setTitleShadowColor:[UIColor whiteColor] forState:UIControlStateHighlighted];
    }
    return self;
}
-(void)setHighlighted:(BOOL)value {
    [super setHighlighted:value];
    [self setNeedsDisplay];
}
-(void)setSelected:(BOOL)value {
    [super setSelected:value];
    [self setNeedsDisplay];
}
- (void)drawRect:(CGRect)rect {
    CGContextRef c = UIGraphicsGetCurrentContext();
    CGFloat w = self.bounds.size.width;
    CGFloat h = self.bounds.size.height;
    CGFloat r = h/2;
    CGColorSpaceRef colorSpace = CGColorSpaceCreateDeviceRGB();

    CGContextSaveGState(c);
    CGContextSetShouldAntialias(c, true);

    // 角丸の描画領域を設定
    CGRect rc = CGRectMake(0, 0, w, h);
    CGContextMoveToPoint(c, CGRectGetMinX(rc), CGRectGetMaxY(rc)-r);
    CGContextAddArcToPoint(c, CGRectGetMinX(rc), CGRectGetMinY(rc), CGRectGetMidX(rc), CGRectGetMinY(rc), r);
    CGContextAddArcToPoint(c, CGRectGetMaxX(rc), CGRectGetMinY(rc), CGRectGetMaxX(rc), CGRectGetMidY(rc), r);
    CGContextAddArcToPoint(c, CGRectGetMaxX(rc), CGRectGetMaxY(rc), CGRectGetMidX(rc), CGRectGetMaxY(rc), r);
    CGContextAddArcToPoint(c, CGRectGetMinX(rc), CGRectGetMaxY(rc), CGRectGetMinX(rc), CGRectGetMidY(rc), r);
    CGContextClip(c);

    // CGGradientを生成する
    // 生成するためにCGColorSpaceと色データの配列が必要になるので適当に用意する
    CGFloat locations[2] = {0.0, 1.0};
    size_t num_locations = 2;
    CGGradientRef gradient;
    if (self.state && (UIControlStateSelected || UIControlStateHighlighted)) {
        CGFloat components[8] = {0.85, 0.85, 0.85, 1.0, 0.68, 0.68, 0.68, 1.0};
        gradient = CGGradientCreateWithColorComponents(colorSpace, components, locations, num_locations);
    } else {
        CGFloat components[8] = {0.9, 0.9, 0.9, 1.0, 0.73, 0.73, 0.73, 1.0};
        gradient = CGGradientCreateWithColorComponents(colorSpace, components, locations, num_locations);
    }

    // 生成したCGGradientを描画する
    // 始点と終点を指定してやると、その間に直線的なグラデーションが描画される。
    CGPoint startPoint = CGPointMake(w/2, 0.0);
    CGPoint endPoint = CGPointMake(w/2, h);
    CGContextDrawLinearGradient(c, gradient, startPoint, endPoint, 0);

    CGContextRestoreGState(c);

    [super drawRect:rect];
}
@end
メインから CustomButton を呼び出す
上記で作った CustomButton をメインから呼び出したら、なぜか drawRect が呼ばれなかった。
なぜだ!? と思ってたら、ボタンを生成するときに buttonWithType の値を UIButtonTypeCustom にしないとダメみたい。なるほど…。
×
CustomButton *btn = [[CustomButton buttonWithType:UIButtonTypeRoundedRect] retain];
○
CustomButton *btn = [[CustomButton buttonWithType:UIButtonTypeCustom] retain];
カスタムボタンの追加はこんな感じ。
CustomButton *btn;
btn = [[CustomButton buttonWithType:UIButtonTypeCustom] retain];
[btn setTitle:@"Click..." forState:UIControlStateNormal];
CGSize size = [btn.titleLabel.text sizeWithFont:btn.titleLabel.font forWidth:4000 lineBreakMode:UILineBreakModeTailTruncation];
btn.frame = CGRectMake(20.0f, 20.0f, size.width + 20.0f, size.height + 10.0f);
[btn addTarget:self action:@selector(didTouchUp:) forControlEvents:UIControlEventTouchUpInside];
[btn release];